
Introduction
Developing new services using microservices patterns requires developers to implement at a much more granular level than what was required in the early days of service-oriented architecture. A larger number of finer grained independent services are going to be created, with API gateways, DevOps pipelines, containers, and orchestration technologies introduced to glue our new microservices together to create complete business solutions in the middle tier.
With the number of independent microservices increasing in the enterprise, eventually it is necessary to consider the infrastructure costs incurred by the buildup of independent services. A microservices solution I was recently helping one of my teams build serves as a case in point. The preferred middle tier platform for this project was Java and Spring Boot. The process of getting the service going was relatively smooth, but while Spring Boot saves a great deal of time in the avoidance of boiler plate code, there are still development cycles needed to setup configuration classes, models, repositories, and service classes before the work is complete. The development model is mature and straightforward, though, so you can get a service going within a reasonable amount of time.
One thing I noticed pretty quickly was that the jar size for even a simple service with a small number of dependencies was still quite large (greater than 30MB) and grew quickly to 40MB once some relatively common packages were added. So, at execution time, we’re looking at a relatively hefty executable and JVM memory footprint, multiplied out by the number of individual microservices one intends to deploy. True, you can have one Spring Boot application service multiple microservice endpoints, but that does not exactly represent the spirit, nor provide all of the benefits, of microservices architecture patterns.
Recently, I came across the excellent Flask package for Python, and used it to quickly build and deploy service stubs that I’ve used for testing in more complex integration scenarios. For the basic delivery of a test payload, I could normally get a service up and into a docker container in just a few minutes. Therefore, I started to consider the possibility of using this rather simple approach for basic microservice endpoints that could stand up to enterprise loads. Now, let’s discuss what I learned.
Environment
To demonstrate microservices development in a Python Flask environment, we will use a vanilla AWS EC2 instance (CentOS) as the service host, and a relational database (PostgreSQL) as a back end data store for service data. The service implementation will be basic REST/JSON without SSL Termination or authentication/authorization features, which can easily be added by load balancers or nginx proxies.
The Setup
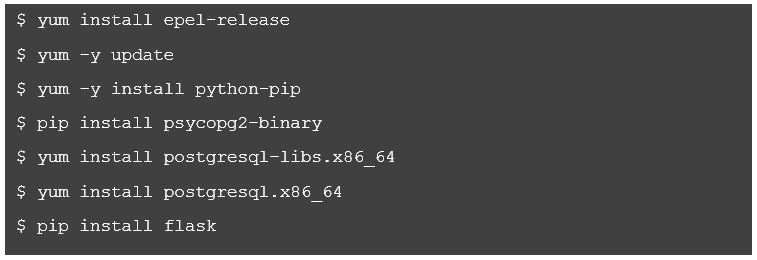
First let’s make sure we have the basic package setup for running Python services that can connect to Postgres. We will use the psycopg2 package for this, thus, we need to make sure we have other, related, dependencies in place as well. To prepare the vanilla CentOS host, I used the following steps (output not included). Depending on the base OS you start with, you may already have some of these dependencies installed or may need to add other dependencies.
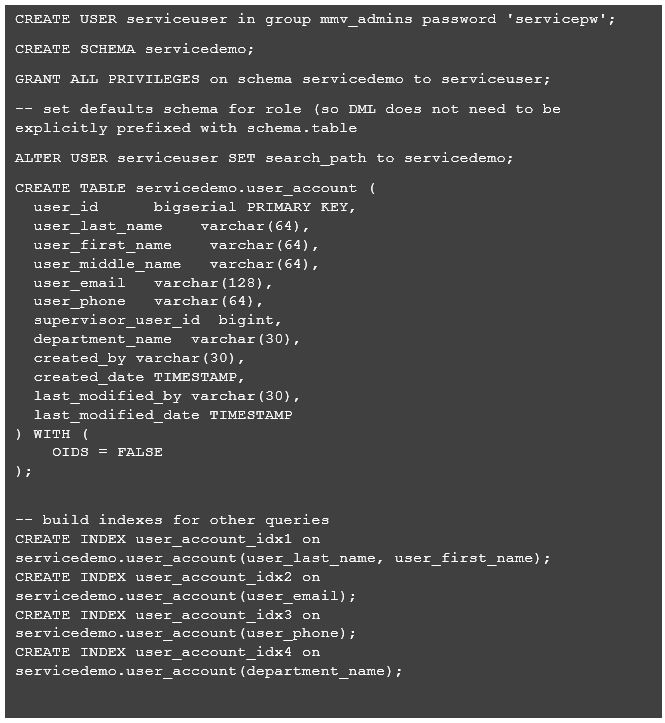
Next, I created a schema in Postgres on an existing RDS instance I had lying around. For demonstration purposes I created a user account table which holds information about system users, so the service developed will be focused on serving user account information. The below code approximates the database setup. It is important to take note that you may need to switch connections depending on the Postgres authorities/roles your connected user has.
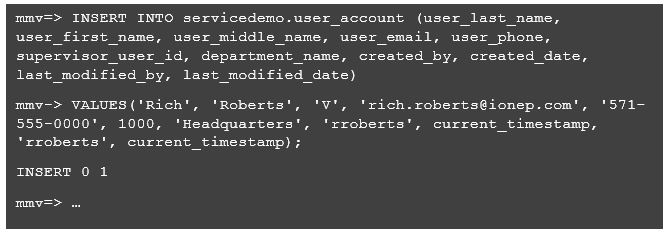
After setting up the database schema and new table, I simple inserted some sample data into the database using a Postgres client session.
The Service Code (the Good Part)
Now that the database is ready, I am going to create a basic Python application to start my service implementation. There are two fundamental aspects I want each Python module to include: a standard convention for externalizing application properties, and mature console logging.
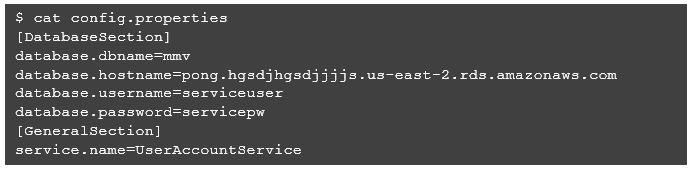
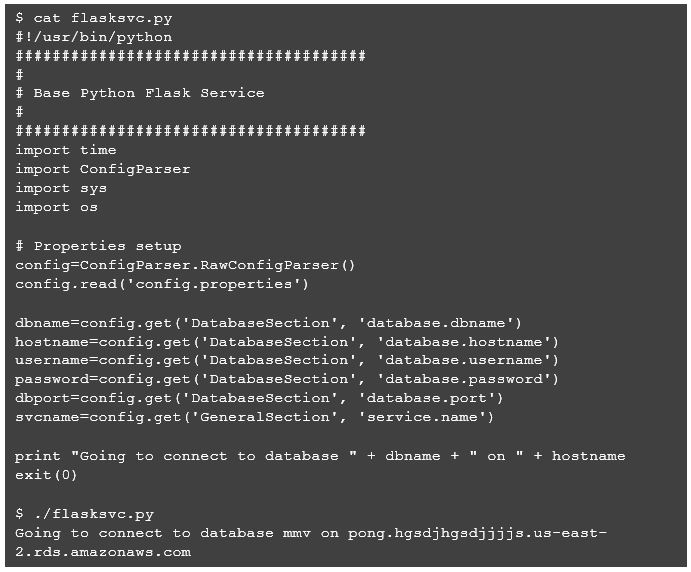
For externalized application properties, we will create a file called config.properties.
Next, we will create a basic Python script to process the properties file.
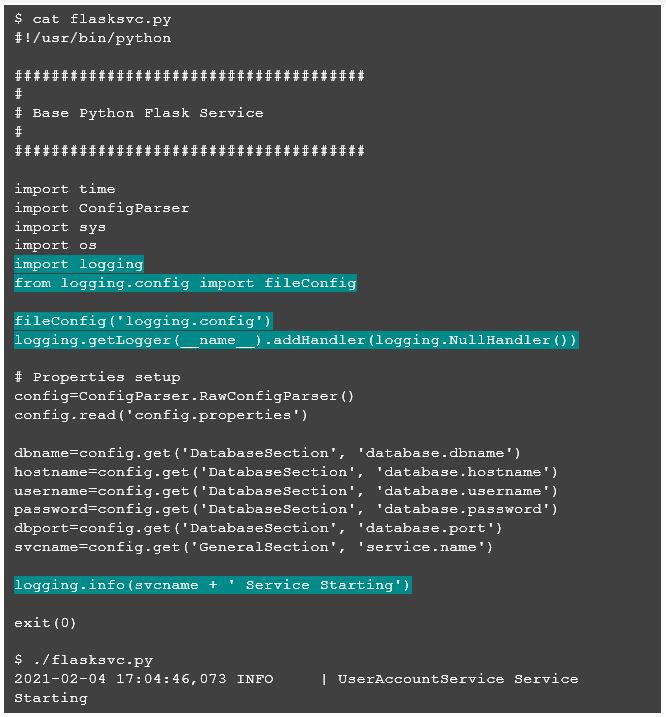
At this point, I will set up console logging. I have never been an “official” Java programmer, but I’ve always liked the log4j framework and have tried to use similar frameworks (or package ports) when developing with other languages. For Python, I’ll use the logging package, which provides many of the things I’m used to with log4j, including multiple configurable log providers, rolling log files, and externalized configuration. I will begin by creating an external logging configuration called logging.config.

Now let’s set up logging in the base Python script we already created.
OK, so we have the basics for a standard Python script with externalized properties and effective console logging. Now, we can incorporate basic Flask functionality to turn this basic script into an actual microservice. Flask is a general-purpose web container for Python which I found to be fast and easy to incorporate for relatively simple endpoints.
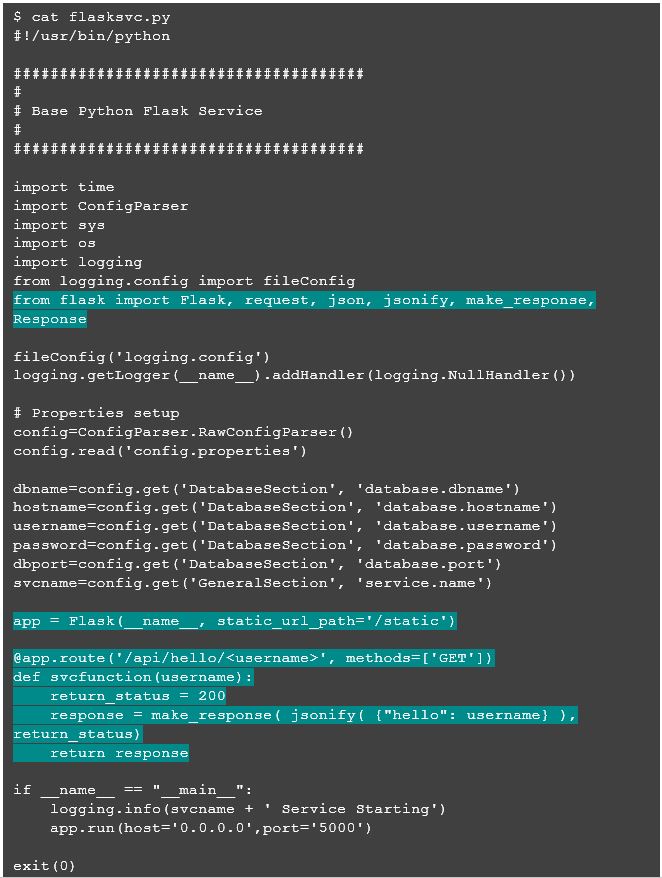
Above, all I needed to do was to create a Flask app and then define a handler for a URI on which I want the HTTP container to listen for incoming requests. Once the URL /api/hello/<username> is accessed, Flask will execute the method svcfunction, passing the username extracted from parsing the URL. The response is a simple json body that contains the argument:

To make it a little cleaner, let’s configure some of the service aspects such as host IP, service port, and service URL as application properties.

We also need the following changes to the Python code to leverage the new properties.
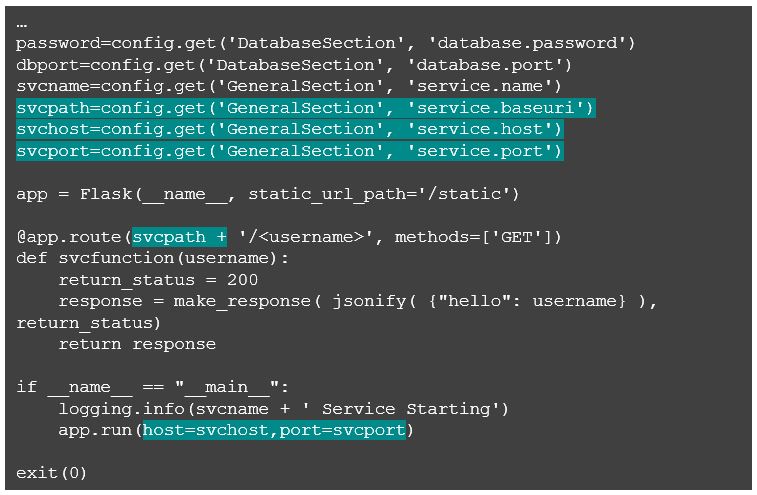
Now our service endpoint URI path, host, and port are configurable as application properties, and by reviewing the console output when we run the Flask service, we see that the new properties have been picked up.
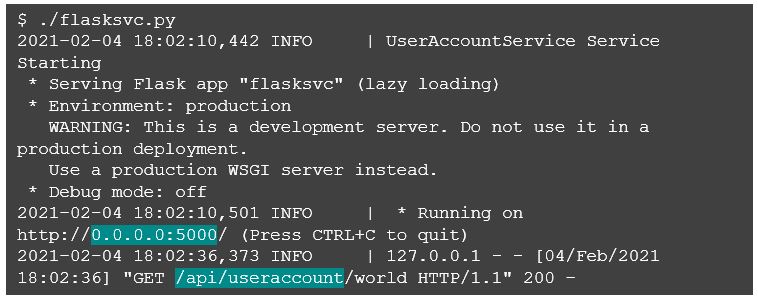
Note the message about using a “production WSGI server instead.” Flask provides a Werkzeug WSGI server for convenience, however, Werkzeug does not provide the features, security, and stability which a production quality WSGI server would be expected to include. There are several options for wrapping your Flask service with a production quality WSGI server which require minimal adjustment to your Flask service.
Another quick note about the host address I configured, which in this example is 0.0.0.0: this simply instructs the Flask service to bind to all public IP addresses for incoming requests. While an explicit host address can be used, I found that just binding all addresses makes it easy when wrapping the Flask endpoint with another container (such as Docker).
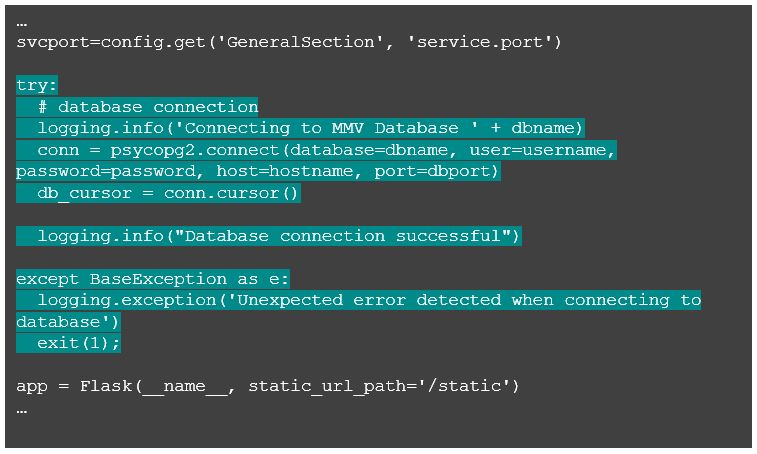
Now, all we need to do is hook up the service to some real(-ish) data in the Postgres database. For the purpose of this simple example, I’m going to use the psycopg2 package to connect to Postgres and query for user account information. First, we are going to create the connection to the database, making sure to catch exceptions. There is no point in initiating the service listener if we cannot talk to the database.
First, add the import.

Next, add the code to establish the connection.
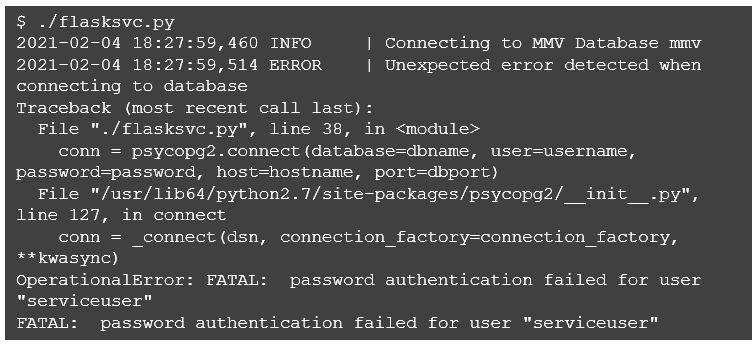
If all goes well, when starting up you will see an additional log message stating that the database connection was successful. If, on the other hand, a connection is not possible, you will see an error, and the service immediately exits. To demonstrate, I will botch the password in the properties file and restart.
Recapping where we are, we now have a Flask service intended for user accounts and a database connection to user for queries. Now we’d like to embed the query in the svcfunction so that the needed query that takes place and a result set is returned in the json.
First, we will add a couple of imports needed to process the results.

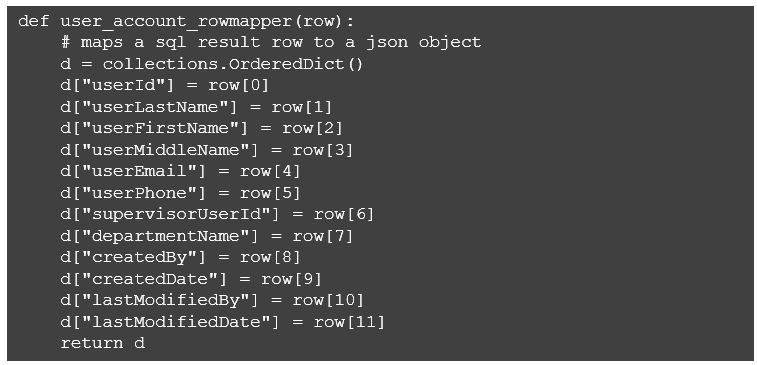
Second, we want a specialized function to convert a row returned from the Postgres query to a dictionary we can convert to a json object. This is because we want to return zero or more json objects in the REST service response, depending on the matches found using query criteria. In the ORM world, this is typically referred to as a row mapper, so we will stick with that convention in the function name.
It’s important to note at this point that there are a number of mature ORM and SQL template packages available for Python. If you are familiar with one or have a preference, you can certainly substitute it for the simple psycopg2 package that I’ve applied here. For most developers, it’s a function of your comfort with coding your own SQL and/or your desire to abstract database interaction from the rest of the code.
In addition, as developers tend to do, let’s think about how it would be possible to make the user_accounts service a little more flexible. For example, a simple solution for querying by user_last_name could be setup behind the following route.

It would be easy to add additional routes to listen for other criteria.

…and so on. It’s a working solution but almost certain to duplicate code. Therefore, I’m going to propose an approach that generalizes the criteria to be used using something like this.

With this approach we can substitute the criteria used in the where clause for the query with code like the following.
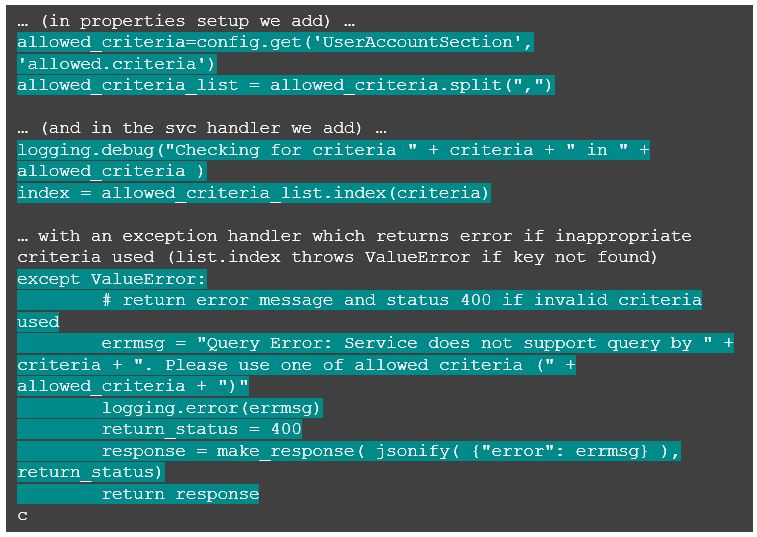
“But Wait!” you say, “That’s an easy exploit for SQL injection!!! Run Away! Run Away!” And that would be absolutely true – which is why it would be critical to restrict the domain of allowable values.
In config.properties we add:

And in our route handler, we check to make sure the value pulled from the URI is explicitly listed. Note that this also provides the capability to curtail the possibility of service queries for which we know there are not appropriate indexes set up in the back end database (see the schema creation above).
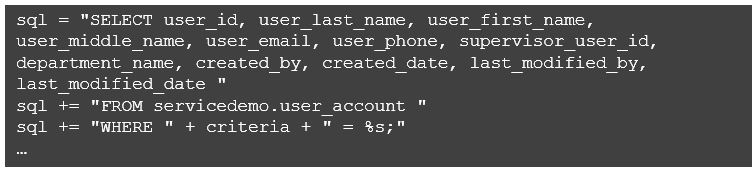
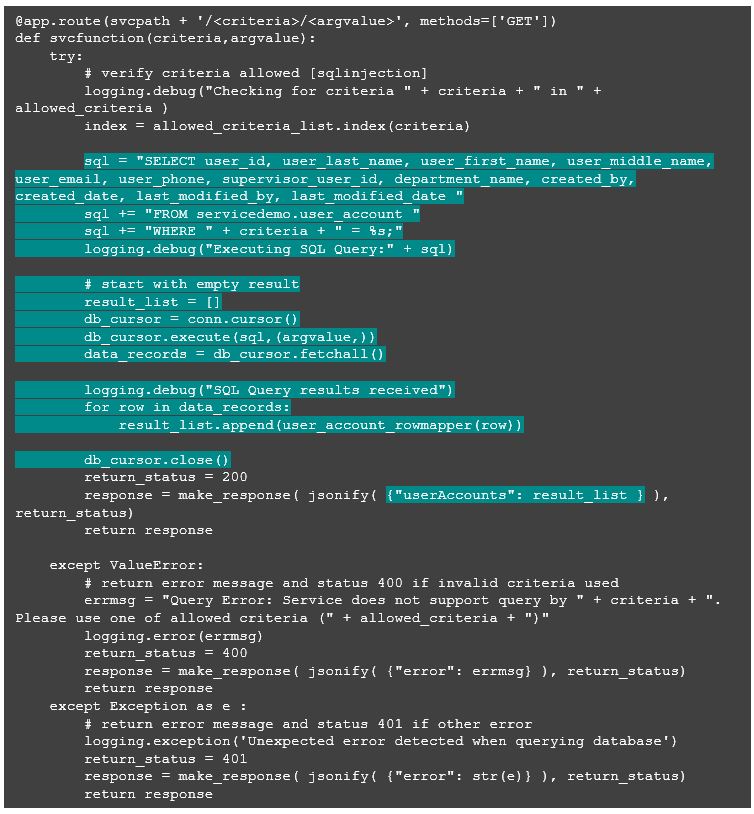
At this point, I’m going to complete the updating my svcfunction on the listening route to add the query and processing of the resulting row set, which is very simple in psycopg2. Here is the entire function, with the database code highlighted.
That’s everything! Let’s run some quick tests with curl to see if we get expected results. Here are the sample rows I set up in the database.

And now, let’s run a few queries to check if results are as expected.
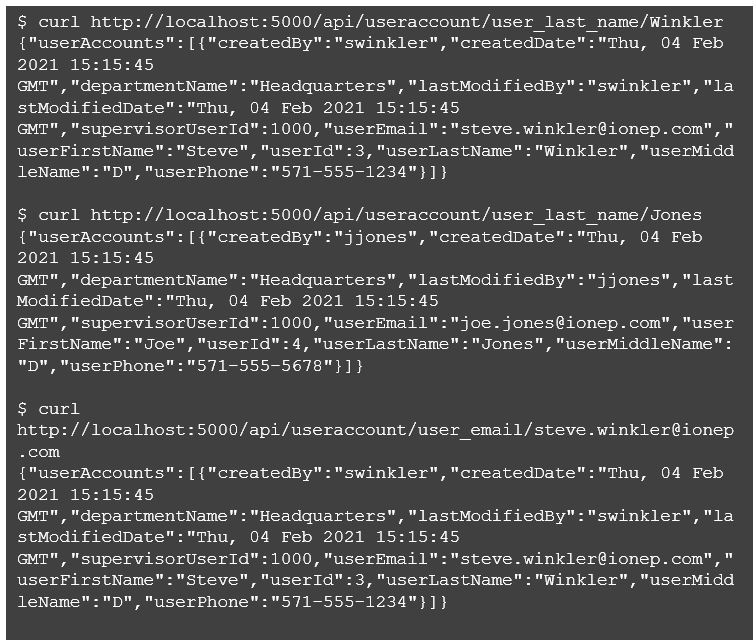
Next, let’s try a query that returns multiple rows.
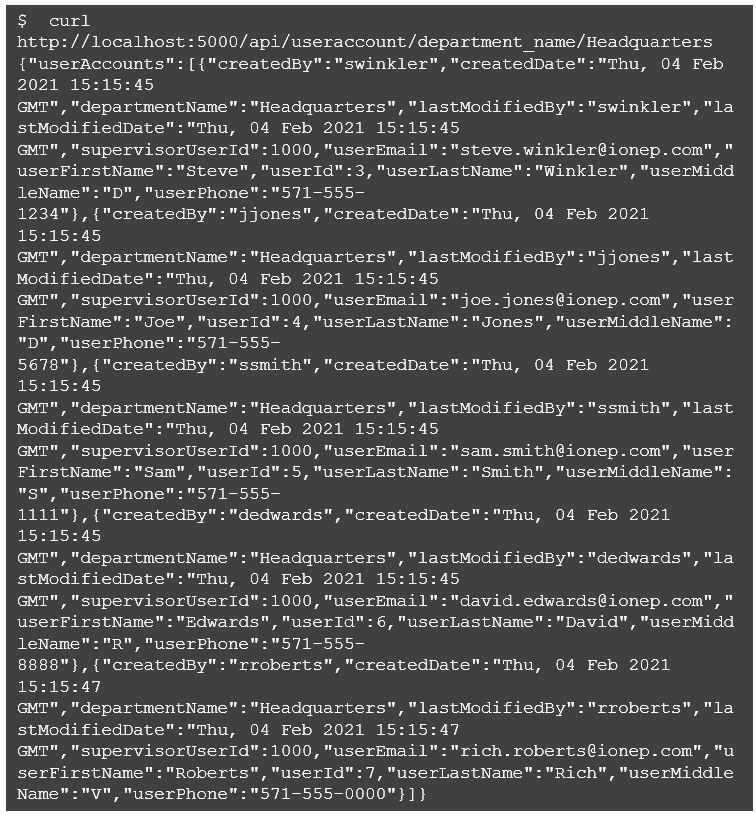
Good to go! Finally, let’s make sure our SQL injection fix is operating as expected.

Conclusion
We completed the implementation of a flexible query microservice using Python and Flask. The implementation includes sufficient logging, management of externalized properties, and appropriate exception handling. What you have now should be a relatively functional service definition which can easily be wrapped in a Docker container for swarming and scaling. Studious observers will note that there may need to be some adjustments made for supporting different SQL types in the back end. Moreover, if you look closely enough there are even more opportunities for genericizing the service to conceivably handle more than one entity type in the back end. So, while this project is complete for now, there are definitely candidate follow-on topics to pursue with additional blogging.
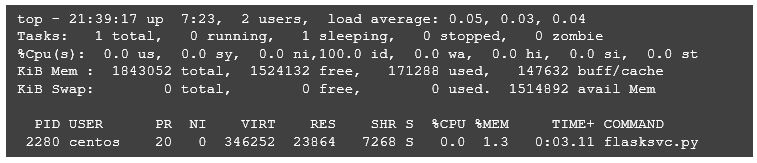
And the “micro” part of microservices? Let’s compare the infrastructure footprint of our Python/Flask Service with the footprint of a Spring Boot based microservice.
Python/Flask:
Java/Spring Boot:
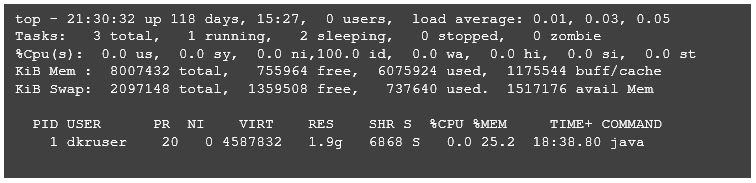
This shows that our Python service comes in with a virtual size of 346kb compared to Java’s 4.5mb, and a resident size of 24k compared to Java’s 1.9gb. Java processes can be greedy with resident memory–when it comes to the heap in the JVM, obviously, more is better. So, with Java/Spring Boot, you will more quickly reach the limits of the number of nodes/containers you can run on a server in your cluster, and this project makes the case for using a viable alternative allowing some portion of your microservices to leave a lighter infrastructure footprint. Approaches like this do not replace Spring Boot for more sophisticated services with complex integration requirements. It can be useful, however, to keep multiple tools in your toolbox.
Complete code for this example can be found on Git.
This post can additionally be viewed on Medium.